XNA (or Monogame) TUTORIAL: Lens Flare Effects (with lighting)
GOAL: Make lighting with a lens flare
Step 1) Create new game project and name it whatever you like. I'll name mine LensFlare(for now). We'll start with this code:
Code:
namespace LensFlare
{
public class Main : Microsoft.Xna.Framework.Game
{
const int SCREENWIDTH = 800, SCREENHEIGHT = 600;
const bool FULLSCREEN = false;
GraphicsDeviceManager graphics;
SpriteBatch spriteBatch;
KeyboardState kb, old_kb; bool ignore_escape = false;
#region C O N S T R U C T O R
public Main()
{
graphics = new GraphicsDeviceManager(this) { PreferredBackBufferWidth = SCREENWIDTH, PreferredBackBufferHeight = SCREENHEIGHT, IsFullScreen = FULLSCREEN };
Content.RootDirectory = "Content";
}
#endregion
#region I N I T
protected override void Initialize()
{
spriteBatch = new SpriteBatch(GraphicsDevice);
base.Initialize();
}
#endregion
#region L O A D
protected override void LoadContent()
{
}
protected override void UnloadContent() { }
#endregion
#region U P D A T E
protected override void Update(GameTime gameTime)
{
kb = Keyboard.GetState();
if ((!ignore_escape)&&(KeyPressed(Keys.Escape))) this.Exit();
if (kb.IsKeyUp(Keys.Escape)) ignore_escape = false;
base.Update(gameTime);
}
bool KeyPressed(Keys key) { return kb.IsKeyDown(key) && old_kb.IsKeyUp(key); }
bool KeyDown(Keys key) { return kb.IsKeyDown(key); }
#endregion
#region D R A W
protected override void Draw(GameTime gameTime)
{
GraphicsDevice.Clear(Color.Black);
old_kb = kb;
base.Draw(gameTime);
}
#endregion
}
}Note: I renamed "Game1.cs" to "main.cs" (not necessary)
Step 2) Let's add a spritesheet containing the lens flare images. First you should create a lens flare sheet or add lens flares to the main world sprite sheet for your game. Using one texture for as many images as possible reduces texture swapping and is faster. There are tutorials for making lens flare images as well as free images which you can customize to suit your game world. Here's an example for this tutorial - add to the Content folder as .png or .dds :
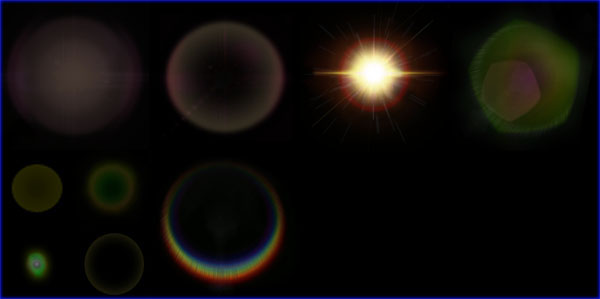
Note: Almost any kind of flare image will be effective - try different things to see what effect you can achieve.
Step 3) Add a background image to the project. I decided to keep it on the same sprite sheet using a resolution that is half the screen with and half its height. I will specify a destination rectangle to stretch it to fit to the screen. Also I added a light image which is not on transparent pixels instead of black. The flares are on black(darkness creates transparency) because I will use additive blending for those effects. The sprite sheet I'm using is 1024x1024:
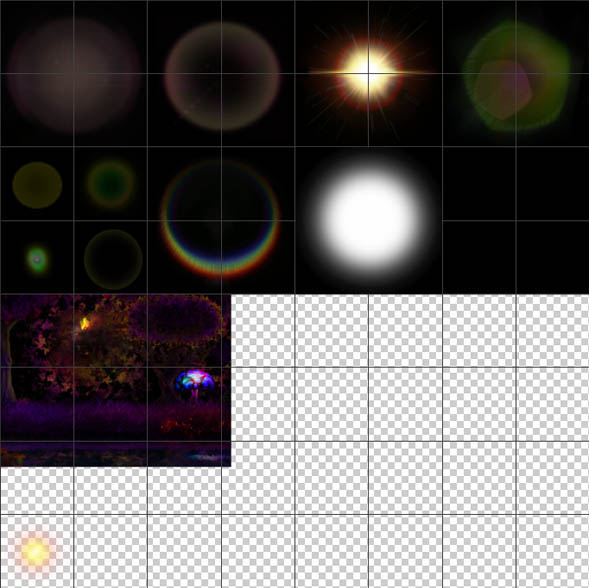
Note: I have grid lines turned on (128x128) to help guide placement of images. (I use info window to see the coordinates)
Step 4) In the project in main.cs (or game1.cs), we will need to add the following variables:
Code:
SpriteBatch spriteBatch;
KeyboardState kb, old_kb; bool ignore_escape = false;
MouseState mos, old_mos;
Texture2D fxTexture;
Rectangle background, backDest;
Rectangle light;
Vector2 mosV, light_origin;
Step 5) Then in Initialize we need to provide the source Rectangle coordinates (yours may be different) on the sprite sheet(fxTexture). Note the light origin is needed to center it around the mouse (which will control the flare effect). Then we load the fxTexture image (whatever you called it when you added it to Content).
Code:
protected override void Initialize()
{
spriteBatch = new SpriteBatch(GraphicsDevice);
background = new Rectangle(0, 512, 400, 300); backDest =new Rectangle(0,0,SCREENWIDTH, SCREENHEIGHT);
light = new Rectangle(0, 896, 128, 128); light_origin = new Vector2(light.Width / 2, light.Height / 2);
base.Initialize();
}
#endregion
#region L O A D
protected override void LoadContent()
{
fxTexture = Content.Load<Texture2D>("Flares");
}
Step 6) In Update, make sure to add(right after kb = Keyboard.GetState()):
mos = Mouse.GetState(); mosV = new Vector2(mos.X, mos.Y); //Get mouse position
Now simply add the code to draw the light at the mouse position in the draw function like so:
Code:
    protected override void Draw(GameTime gameTime)
    {
        GraphicsDevice.Clear(Color.Black);

        spriteBatch.Begin(SpriteSortMode.Deferred, BlendState.NonPremultiplied);
        spriteBatch.Draw(fxTexture, backDest, background, Color.White);
        spriteBatch.Draw(fxTexture, mosV, light, Color.White, 0f, light_origin, 1f, SpriteEffects.None, 0f);
        spriteBatch.End();

        old_kb = kb; old_mos = mos;
        base.Draw(gameTime);
    }
Now if you hit F5 to test, you'll see the mouse as a... sort of boring light source at this point. We'll fix that... :)
We'll start by adding a blue light to the mushroom(for variety) and a point light source to the mouse light. To do this we'll need to create a custom BlendState to blend our lights onto the scene. But first we need to Additive draw the lights onto a black RenderTarget...
Step 7) To do that, we need these variables (at top of main.cs(or game1.cs))
Code:
Rectangle light, lightAdditive;
Vector2 mosV, light_origin, light_add_origin;
RenderTarget2D lightsTarget;
Color lightColor = Color.White;
BlendState blendState;
float light_scale = 1f, light_scale2 = 0.4f, pulse_timer=0f, slow_pulse=0f;
Step 8) Now we create the renderTarget for the lights and our custom blendState
. We also need to get the coordinates of the additive light (in ftTexture) which should be a white circular light that fades at the edge of the circle (and its origin is half width and height 128,128 to be centered)..
Code:
protected override void Initialize()
{
spriteBatch = new SpriteBatch(GraphicsDevice);
background = new Rectangle(0, 512, 400, 300); backDest =new Rectangle(0,0,SCREENWIDTH, SCREENHEIGHT);
light = new Rectangle(0, 896, 128, 128); light_origin = new Vector2(64,64);
lightsTarget = new RenderTarget2D(GraphicsDevice, SCREENWIDTH / 4, SCREENHEIGHT / 4);
blendState = new BlendState();
blendState.AlphaDestinationBlend = Blend.SourceColor;
blendState.ColorDestinationBlend = Blend.SourceColor;
blendState.AlphaSourceBlend = Blend.Zero;
blendState.ColorSourceBlend = Blend.Zero;
lightAdditive = new Rectangle(511, 255, 255, 255); light_add_origin = new Vector2(128, 128);
base.Initialize();
}Step 9) In UPDATE: Add some timing and scale controls to animate the light pulse. Also we add some controls so you can change the main light color if you want:
Code:
if (KeyDown(Keys.D1)) lightColor = Color.Red;
if (KeyDown(Keys.D2)) lightColor = Color.YellowGreen;
if (KeyDown(Keys.D3)) lightColor = Color.Blue;
if (KeyDown(Keys.D4)) lightColor = Color.White;
pulse_timer += 0.14f; if (pulse_timer > 6.27) pulse_timer = 0f;
slow_pulse += 0.08f; if (slow_pulse > 6.27) slow_pulse = 0f;
light_scale = (7f+(float)Math.Sin(pulse_timer))/9f;
light_scale2 = (7f+(float)Math.Sin(slow_pulse))/10f;
base.Update(gameTime);The way this works is SIN makes numbers go up and down like a wave from -1 to 1 at a speed set by the pulse_timer or slow_pulse(if you make them count faster it will pulse quicker). I add 7 so it pulses from size 6-8... but that's about 9 times bigger than I want it scaled on screen so I divide the result by 9 (pulse scale of 0.6666-0.8888). You can play with these for various results.
Step 10) We change Draw so that first the renderTarget is lightTarget (Cleared to some Dark Ambient Color slightly dark-bluish-gray [night ambience]) and we Additive draw the lights onto it (a blue one in the mushroom) and the regular bright mouse light source. You should notice that since the renderTarget is 4 times smaller than the screen, all the coordinates must be divided by 4 to be in the correct places on the target. After, we will stretch the rendertarget overtop of the scene and blend it.
Next we set the renderTarget to null to draw to the regular backbuffer where we draw our scene normally...
Lastly, we set the blendState to our custom blendState and draw the lightsTarget we made stretched over the scene to blend in the lights. This is what the Draw should look like:
Code:
protected override void Draw(GameTime gameTime)
{
GraphicsDevice.SetRenderTarget(lightsTarget);
GraphicsDevice.Clear(new Color(40,50,60));
spriteBatch.Begin(SpriteSortMode.Deferred, BlendState.Additive);
spriteBatch.Draw(fxTexture, mosV/4, lightAdditive, lightColor, 0f, light_add_origin, light_scale, SpriteEffects.None, 0f);
spriteBatch.Draw(fxTexture, new Vector2(168,73), lightAdditive, new Color(30,60,255), 0f, light_add_origin, light_scale2, SpriteEffects.None, 0f);
spriteBatch.End();
GraphicsDevice.SetRenderTarget(null);
GraphicsDevice.Clear(Color.Black);
spriteBatch.Begin(SpriteSortMode.Deferred, BlendState.NonPremultiplied);
spriteBatch.Draw(fxTexture, backDest, background, Color.White);
spriteBatch.Draw(fxTexture, mosV, light, lightColor, 0f, light_origin, 2f, SpriteEffects.None, 0f);
spriteBatch.End();
spriteBatch.Begin(SpriteSortMode.Deferred, blendState, null, null, null);
spriteBatch.Draw(lightsTarget, new Rectangle(0,0,SCREENWIDTH,SCREENHEIGHT), Color.White);
spriteBatch.End();
old_kb = kb; old_mos = mos;
base.Draw(gameTime);
}Now if you run it you should see the lights in action - without flares yet but we're getting there :)
Step 11) Now we need to create a vector between the light source and the screen center. This invisible line connecting the 2 points acts like a little string that holds the flares which are like the beads on a string. We could use a 3D vector for a more perspective-accurate account for the positions, but I don't think anyone would notice the difference. So what we'll do is create a flare class which will hold the source-rects of the flare images, as well as origin, position, scale, tint and even rotate(as a couple will rotate in this one). The closer the light is to the center of the screen, the more the flares will pass over top of each other and also their opacity becomes stronger. I will scale them initially to get the size I want, and will animate some rotation and color transparency (and position obviously).
So let's start by going into the solution exporer and right click and add a new class called flare. A flare will need a sourceRect, origin, position, scale, rotation, color, and a percentage offset distance between the 2 points along the vector:
Code:
namespace LensFlare
{
class Flare
{
public Rectangle rect;
public Vector2 origin;
public float offset;
public Vector2 pos;
public float rot;
public float scale;
public Color color;
public Flare(Rectangle sourceRect, float distance, float _scale, Color tint) {
rect = sourceRect;
origin = new Vector2(sourceRect.Width / 2, sourceRect.Height / 2);
offset = distance;
pos = Vector2.One;
rot = 0f;
scale = _scale;
color = tint;
}
}
}Step 12) We'll need to add a list or array of Flares in the main class. Go back into your root game class and add an array of flares and a Vector to remember the screen center:
Code:
Flare[] flares;
int num_flares = 0;
Vector2 screen_center;
Step 13) Just after (or before) the initialize method, we'll add this little helper method to construct the flares easier:
Code:
void AddFlare(int x, int y, int w, int h, float distance, float scale) {
flares[num_flares] = new Flare(new Rectangle(x, y, w, h), (distance-0.5f)*2f, scale, Color.White); num_flares++;
}Note: I subtract 0.5 from the or scale (0-1) to get -0.5 to +0.5 then *2 to get -1 to +1. This is because instead of starting the flares at the screen center to the light, I want to start at same distance on the opposite side of the light through the center and to the light.
Step 14) In INITIALIZE, we'll set the screen center and add our flares. Each flare needs rectangle source coordinates, the percentage distance along the vector(0-1), and a scale(0-1):
Code:
screen_center = new Vector2(SCREENWIDTH / 2, SCREENHEIGHT / 2);
flares = new Flare[30];
AddFlare(1, 1, 254, 254, 1.2f, 2.1f);
AddFlare(258, 1, 254, 254, 1.1f, 0.9f);
AddFlare(513, 1, 254, 254, 1.0f, 1.1f);
AddFlare(0, 256, 126, 126, 0.8f, 1.1f);
AddFlare(0, 256, 126, 126, 0.7f, 1f);
AddFlare(4, 388, 122, 122, 0.6f, 0.4f);
AddFlare(4, 388, 122, 122, 0.4f, 0.44f);
AddFlare(4, 388, 122, 122, 0.3f, 0.36f);
AddFlare(770, 1, 254, 254, 0.37f, 1f);
AddFlare(770, 1, 254, 254, 0.18f, 1.6f);
AddFlare(129, 257, 122, 122, 0.13f, 1.4f);
AddFlare(129, 385, 122, 122, 0.16f, 1f);
AddFlare(129, 385, 122, 122, 0.9f, 1.1f);
AddFlare(129, 385, 122, 122, 1.14f, 1.1f);
AddFlare(257, 257, 254, 254, 0.07f, 1.1f);
base.Initialize();
}Step 15) In the Update method, we need to calculate the position of each flare. We multiply the offset percentage along the vector between the light position and screen center (and add screen center so its relative to that position) Example:
flares[i].pos = flares[i].offset * vec + screen_center;
Also most flares will be rotated to face the center of the screen(looks more real). To do this I just set rot to the angle using tan to get the angle from vec like this example:
flares[i].rot = (float)Math.Atan2(vec.Y, vec.X);
Adjusting the transparency of each flare is a little harder. I need some approximate distance the flare is from the center to decide by how much to scale the alpha channel of the color. Also the color needs to be clamped between 0,255 as a byte like this example:
Vector2 radius_vec = vec / 300;
flares[i].color.A = (byte)MathHelper.Clamp(255.0f-255.0f * radius_vec.LengthSquared(), 0f, 255f);
I divide by 300 to make it fade at a desirable distance (ie: 400 if you want further). I scale the amount to subtract by by the approximate distance and clamp it from 0-255.
This is what we need to add to the Update method to do this:
Code:
Vector2 vec = mosV - screen_center;
int i = 0;
do
{
flares[i].pos = flares[i].offset * vec + screen_center;
if (i!=2)
flares[i].rot = (float)Math.Atan2(vec.Y, vec.X);
if (i + 1 == num_flares) flares[i].rot += MathHelper.PiOver2;
flares[i].color = lightColor;
Vector2 radius_vec = vec / 300;
Vector2 radius_vec2 = vec / 450;
if (i!=2) flares[i].color.A = (byte)MathHelper.Clamp(255.0f-255.0f * radius_vec.LengthSquared(), 0f, 255f);
else flares[i].color.A = (byte)MathHelper.Clamp(255.0f - 255.0f * radius_vec2.LengthSquared(), 0f, 255f);
i++;
} while (i < num_flares);
base.Update(gameTime);Step 16) Now we just need to draw our flares. I decided to add a slight influence of the pulsation of the light to the the lens flare scales (by adding the scale divided down so the influence is small).
To make our flares look good, we'll additive blend them and draw them after the part where we blended the lightsTarget onto the scene. So we simply draw the flares like so:
Code:
spriteBatch.End();
spriteBatch.Begin(SpriteSortMode.Deferred, blendState, null, null, null);
spriteBatch.Draw(lightsTarget, new Rectangle(0,0,SCREENWIDTH,SCREENHEIGHT), Color.White);
spriteBatch.End();
spriteBatch.Begin(SpriteSortMode.Deferred, BlendState.Additive);
int i = 0;
do
{
spriteBatch.Draw(fxTexture, flares[i].pos, flares[i].rect, flares[i].color, flares[i].rot, flares[i].origin,
flares[i].scale+light_scale/10, SpriteEffects.None, 0);
i++;
} while (i < num_flares);
spriteBatch.End();
old_kb = kb; old_mos = mos;
base.Draw(gameTime);
This is what the final code should look like:
Code:
namespace LensFlare
{
public class Main : Microsoft.Xna.Framework.Game
{
const int SCREENWIDTH = 800, SCREENHEIGHT = 600;
const bool FULLSCREEN = false;
GraphicsDeviceManager graphics;
SpriteBatch spriteBatch;
KeyboardState kb, old_kb; bool ignore_escape = false;
MouseState mos, old_mos;
Texture2D fxTexture;
Rectangle background, backDest;
Rectangle light, lightAdditive;
Vector2 mosV, light_origin, light_add_origin;
RenderTarget2D lightsTarget;
Color lightColor = Color.White;
BlendState blendState;
float light_scale = 1f, light_scale2 = 0.4f, pulse_timer=0f, slow_pulse=0f;
Flare[] flares;
int num_flares = 0;
Vector2 screen_center;
#region C O N S T R U C T O R
public Main()
{
graphics = new GraphicsDeviceManager(this) { PreferredBackBufferWidth = SCREENWIDTH, PreferredBackBufferHeight = SCREENHEIGHT, IsFullScreen = FULLSCREEN };
Content.RootDirectory = "Content";
}
#endregion
#region I N I T
protected override void Initialize()
{
spriteBatch = new SpriteBatch(GraphicsDevice);
background = new Rectangle(0, 512, 400, 300); backDest =new Rectangle(0,0,SCREENWIDTH, SCREENHEIGHT);
light = new Rectangle(0, 896, 128, 128); light_origin = new Vector2(64,64);
lightsTarget = new RenderTarget2D(GraphicsDevice, SCREENWIDTH / 4, SCREENHEIGHT / 4);
blendState = new BlendState();
blendState.AlphaDestinationBlend = Blend.SourceColor;
blendState.ColorDestinationBlend = Blend.SourceColor;
blendState.AlphaSourceBlend = Blend.Zero;
blendState.ColorSourceBlend = Blend.Zero;
lightAdditive = new Rectangle(511, 255, 255, 255); light_add_origin = new Vector2(128, 128);
screen_center = new Vector2(SCREENWIDTH / 2, SCREENHEIGHT / 2);
flares = new Flare[30];
AddFlare(1, 1, 254, 254, 1.2f, 2.1f);
AddFlare(258, 1, 254, 254, 1.1f, 0.9f);
AddFlare(513, 1, 254, 254, 1.0f, 1.1f);
AddFlare(0, 256, 126, 126, 0.8f, 1.1f);
AddFlare(0, 256, 126, 126, 0.7f, 1f);
AddFlare(4, 388, 122, 122, 0.6f, 0.4f);
AddFlare(4, 388, 122, 122, 0.4f, 0.44f);
AddFlare(4, 388, 122, 122, 0.3f, 0.36f);
AddFlare(770, 1, 254, 254, 0.37f, 1f);
AddFlare(770, 1, 254, 254, 0.18f, 1.6f);
AddFlare(129, 257, 122, 122, 0.13f, 1.4f);
AddFlare(129, 385, 122, 122, 0.16f, 1f);
AddFlare(129, 385, 122, 122, 0.9f, 1.1f);
AddFlare(129, 385, 122, 122, 1.14f, 1.1f);
AddFlare(257, 257, 254, 254, 0.07f, 1.1f);
base.Initialize();
}
void AddFlare(int x, int y, int w, int h, float distance, float scale) {
flares[num_flares] = new Flare(new Rectangle(x, y, w, h), (distance-0.5f)*2f, scale, Color.White); num_flares++;
}
#endregion
#region L O A D
protected override void LoadContent()
{
fxTexture = Content.Load<Texture2D>("Flares");
}
protected override void UnloadContent() { }
#endregion
#region U P D A T E
protected override void Update(GameTime gameTime)
{
kb = Keyboard.GetState();
mos = Mouse.GetState(); mosV = new Vector2(mos.X, mos.Y);
if ((!ignore_escape)&&(KeyPressed(Keys.Escape))) this.Exit();
if (kb.IsKeyUp(Keys.Escape)) ignore_escape = false;
if (KeyDown(Keys.D1)) lightColor = Color.Red;
if (KeyDown(Keys.D2)) lightColor = Color.YellowGreen;
if (KeyDown(Keys.D3)) lightColor = Color.Blue;
if (KeyDown(Keys.D4)) lightColor = Color.White;
pulse_timer += 0.14f; if (pulse_timer > 6.27) pulse_timer = 0f;
slow_pulse += 0.08f; if (slow_pulse > 6.27) slow_pulse = 0f;
light_scale = (7f+(float)Math.Sin(pulse_timer))/9f;
light_scale2 = (7f+(float)Math.Sin(slow_pulse))/10f;
Vector2 vec = mosV - screen_center;
int i = 0;
do
{
flares[i].pos = flares[i].offset * vec + screen_center;
if (i!=2)
flares[i].rot = (float)Math.Atan2(vec.Y, vec.X);
if (i + 1 == num_flares) flares[i].rot += MathHelper.PiOver2;
flares[i].color = lightColor;
Vector2 radius_vec = vec / 300;
Vector2 radius_vec2 = vec / 450;
if (i!=2) flares[i].color.A = (byte)MathHelper.Clamp(255.0f-255.0f * radius_vec.LengthSquared(), 0f, 255f);
else flares[i].color.A = (byte)MathHelper.Clamp(255.0f - 255.0f * radius_vec2.LengthSquared(), 0f, 255f);
i++;
} while (i < num_flares);
base.Update(gameTime);
}
bool KeyPressed(Keys key) { return kb.IsKeyDown(key) && old_kb.IsKeyUp(key); }
bool KeyDown(Keys key) { return kb.IsKeyDown(key); }
#endregion
#region D R A W
protected override void Draw(GameTime gameTime)
{
GraphicsDevice.SetRenderTarget(lightsTarget);
GraphicsDevice.Clear(new Color(40,50,60));
spriteBatch.Begin(SpriteSortMode.Deferred, BlendState.Additive);
spriteBatch.Draw(fxTexture, mosV/4, lightAdditive, lightColor, 0f, light_add_origin, light_scale, SpriteEffects.None, 0f);
spriteBatch.Draw(fxTexture, new Vector2(168,73), lightAdditive, new Color(30,60,255), 0f, light_add_origin, light_scale2, SpriteEffects.None, 0f);
spriteBatch.End();
GraphicsDevice.SetRenderTarget(null);
GraphicsDevice.Clear(Color.Black);
spriteBatch.Begin(SpriteSortMode.Deferred, BlendState.NonPremultiplied);
spriteBatch.Draw(fxTexture, backDest, background, Color.White);
spriteBatch.Draw(fxTexture, mosV, light, lightColor, 0f, light_origin, 2f, SpriteEffects.None, 0f);
spriteBatch.End();
spriteBatch.Begin(SpriteSortMode.Deferred, blendState, null, null, null);
spriteBatch.Draw(lightsTarget, new Rectangle(0,0,SCREENWIDTH,SCREENHEIGHT), Color.White);
spriteBatch.End();
spriteBatch.Begin(SpriteSortMode.Deferred, BlendState.Additive);
int i = 0;
do
{
spriteBatch.Draw(fxTexture, flares[i].pos, flares[i].rect, flares[i].color, flares[i].rot, flares[i].origin, flares[i].scale+light_scale/10, SpriteEffects.None, 0);
i++;
} while (i < num_flares);
spriteBatch.End();
old_kb = kb; old_mos = mos;
base.Draw(gameTime);
}
#endregion
}
}
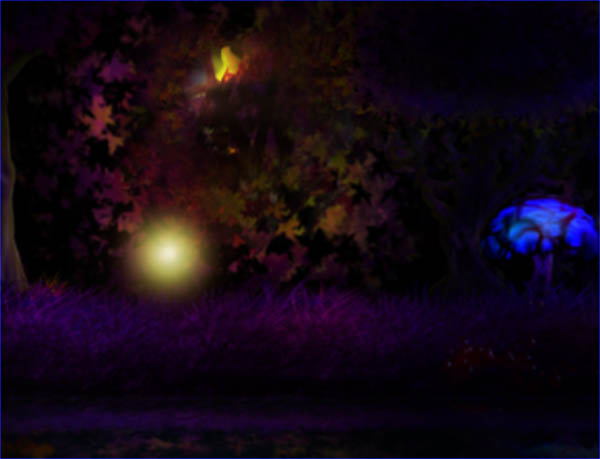
And the results are beautiful! (^-^)

Project Source Code
Home Page