MonoGame / FNA / XNA Tutorial:
Platformer Game Programming Tutorial
With Effects and Smooth Animation
(Page1, Page2, Page3, Page4, Page5)
Page1:
In this tutorial we'll create a platformer game including:
-
crystal fx shader
-
frame animator __ (for explosions)
-
particle system for fireball spells __ (could add heat haze effect later)
-
MeoMotion animated characters __ (could use traditional if you like)
- AI __ (and discuss how to make more advanced)
(If you wish to make a translated version of this tutorial - feel free to do so)
You'll need:
- At least some c# programming knowledge
- Download/install Monogame
- At least some background knowledge of: programming, graphics, and dealing with GPU
1) Start a new Project (I'm using Monogame Cross-Platform Desktop) and name your game. Proceed by tidying up comments in Game1.cs however you like.
2) Go to solution explorer, right-click your project name (ie: Platformer) and Add >> New Folder __ and call it 'User Interface'
__ now right click on that folder and Add >> class __ and call it 'Input' __ then double click into input.cs and add this:
- public class Input
- {
- public KeyboardState kb, okb;
- public bool shift_down, control_down, alt_down;
- public bool shift_press, control_press, alt_press;
- public bool old_shift_down, old_control_down, old_alt_down;
- public Input()
- {
- // may want to disable windows key temporarily in here (or not)
- }
- [MethodImpl(MethodImplOptions.AggressiveInlining)]
- public bool Keypress(Keys k) { if (kb.IsKeyDown(k) && okb.IsKeyUp(k)) return true; else return false; }
- [MethodImpl(MethodImplOptions.AggressiveInlining)]
- public bool Keydown(Keys k) { if (kb.IsKeyDown(k)) return true; else return false; }
- //------------
- // U P D A T E
- //------------
- public void Update()
- {
- old_alt_down = alt_down; old_shift_down = shift_down; old_control_down = control_down;
- okb = kb;
- kb = Keyboard.GetState();
- shift_down = false; shift_press = false;
- control_down = false; control_press = false;
- alt_down = false; alt_press = false;
- if (kb.IsKeyDown(Keys.LeftShift) || kb.IsKeyDown(Keys.RightShift)) shift_down = true;
- if (kb.IsKeyDown(Keys.LeftControl) || kb.IsKeyDown(Keys.RightControl)) control_down = true;
- if (kb.IsKeyDown(Keys.LeftAlt) || kb.IsKeyDown(Keys.RightAlt)) alt_down = true;
- if ((shift_down) && (!old_shift_down)) shift_press = true;
- if ((control_down) && (!old_control_down)) control_press = true;
- if ((alt_down) && (!old_alt_down)) alt_press = true;
- }
- }
Tip: When you first type KeyboardState, you may notice it is underlined. Right click it and resolve: using Microsoft.Xna.Framework.Input; __ this will automatically add the necessary 'using' at the top of the module and help the compiler.
kb, okb are the keyboard state and old keyboard state which are compared to decide if a button is held or tapped (recent press).
Method Implementation Options for Aggressive Inlining basically tell the compiler to try to place these commands directly in the method rather than calling them as their own methods (if it can). This could be (sort-of) compared to #define macros in C/C++. Keypress checks if a key was tapped. Keydown only tells if it is currently down.
Update is called in Game1 each loop to keep control / key status info up to date. The reason for this is module is partly to make code easier to read in other modules checking gamer input and also to set things up for player-input mapping in the future (if need)
3) Go into Game1.cs (main)
Add the Input class: Input inp; and make it in Initialize() [ie: inp = new Input(); ]
Then use inp in Update as follows:
- //------------
- // U P D A T E
- //------------
- protected override void Update(GameTime gameTime)
- {
- inp.Update();
- if (inp.Keypress(Keys.Escape)) Exit(); // <-- CHANGE LATER - (to go to menu state - then provide exit option in menu)
- base.Update(gameTime);
- }
4) Setup display.
We'll be setting a target resolution (ie: 1024 x 768). You could use a lower resolution target for a more retro look or higher if you like. A standard target resolution is useful because it's easy to program and design everything based around that resolution and it can be scaled in the final output to match the actual display resolution for the device.
In Game1.cs, we'll add some useful parameters:
- //DISPLAY
- const int SCREENWIDTH = 1024, SCREENHEIGHT = 768; // TARGET FORMAT
- const bool FULLSCREEN = false; // not fullscreen because using windowed fill-screen mode
- GraphicsDeviceManager graphics;
- PresentationParameters pp;
- SpriteBatch spriteBatch;
While you could use fullscreen mode, it may be better to use a borderless window mode that looks like fullscreen mode for a variety of possible reasons (ie: some security-software can cause exclusive fullscreen mode to crash).
In our various modules, we'll also might frequently need to know the current resolution so we'll include some static variables for global access to them:
- static public int screenW, screenH;
- static public Vector2 screen_center;
In the contructor
of Game1, we'll create the backbuffer to match the current device resolution so it covers the entire screen.
This is not the same as the target resolution I mentioned. Everything will be rendered to a target which is then applied to the final backbuffer at the end. Normally you'd only use a backbuffer. [ a backbuffer does page flipping and only shows finished renders ]
For convience, we'll also keep globals for the screenRect (rectangle that matches target resolution ie: 0,0,1024,768) and the original desktop, resolution rectangle. ie: (0,0,1680,1050)
The MainTarget holds our standard target resolution before being applied to the device's backbuffer.
- //SOURCE RECTANGLES
- Rectangle screenRect, desktopRect; // render target size, desktop screen size
- //RENDERTARGETS
- RenderTarget2D MainTarget; // render to a standard target and fit it to the desktop resolution
- //------------------
- // C O N S T R U C T
- //------------------
- public Game1()
- {
- // Set a display mode that is windowed but is the same as the desktop's current resolution (don't show a border)...
- // This is done instead of using true fullscreen mode since some firewalls will crash the computer in true fullscreen mode
- int initial_screen_width = GraphicsAdapter.DefaultAdapter.CurrentDisplayMode.Width-10;
- int initial_screen_height = GraphicsAdapter.DefaultAdapter.CurrentDisplayMode.Height-10;
- graphics = new GraphicsDeviceManager(this)
- {
- PreferredBackBufferWidth = initial_screen_width,
- PreferredBackBufferHeight = initial_screen_height,
- IsFullScreen = false, PreferredDepthStencilFormat = DepthFormat.Depth16
- };
- Window.IsBorderless = true;
Content.RootDirectory = "Content";
}
Gets the default resolution (ie: desktop res), and sets the members for the graphics device to prefer that resolution and just use windowed mode (also set to allow DepthStencil format - ie: 16bit depth - we won't actually use this in this tutorial but could be usefull for more advanced things later - ie: occlusion fx)
Also set window to borderless so it looks like a regular fullscreen mode.
In the following code, we set our main render target with our game's standard resolution.
SideNote: For safety, I keep the habit of checking the presentation parameters for the backbuffer that was created in the constructor above. For example, sometimes if you create a fullscreen mode with preferred resolution, it will create the closest compatible allowed resolution - so you need to copy the true backbuffer dimensions (screen_width, screen_height) from the presentation parameters (because you might not get what you asked for).
In this case, screenW & screenH refer to the target's resolution. We capture the rectangles for source/destination purposes later.
Since the tile-grid has "tiles" of size 64x64, I subtract (32,32) to get the coordinate of what would be the corner of a tile centered on the screen. This will come in handle later for scrolling the tile-grid system relative to the screen's center.
- //--------
- // I N I T
- //--------
- protected override void Initialize()
- {
- // SETUP SPRITEBATCH AND GET TRUE DISPLAY
- spriteBatch = new SpriteBatch(GraphicsDevice);
- MainTarget = new RenderTarget2D(GraphicsDevice, SCREENWIDTH, SCREENHEIGHT);
- pp = GraphicsDevice.PresentationParameters;
- SurfaceFormat format = pp.BackBufferFormat;
- screenW = MainTarget.Width;
- screenH = MainTarget.Height;
- desktopRect = new Rectangle(0, 0, pp.BackBufferWidth, pp.BackBufferHeight);
- screenRect = new Rectangle(0, 0, screenW, screenH);
- screen_center = new Vector2(screenW / 2.0f, screenH / 2.0f) - new Vector2(32f, 32f); // subtracting half of the size of a tile since this is for tile calculations
5) Background(s) Parallax Scrolling
We'll need to have a couple background layers (as Texture2D) and something to track their movements.
In the variables for Game1.cs, (perhaps under Input inp;), add the following:
- //TEXTURES
- Texture2D far_background, mid_background;
- Texture2D tiles_image;
- //POSITIONS
- static public Vector2 background_pos;
I'm making background_pos as static (rather than passing it) so that when we add an editor class or others, it'll be easy to access and move the backgrounds when desired.
tiles_image - stores all the images related to the game map (ie: grass, trees, crystals, etc)
You'll need to go into a paint program of some kind (Photoshop, Gimp, Krita, Sai, etc...) and make a background (ie: far background of stars in a sunset) calling it "background_stars" for example...
To make a seamless repeating tile or background:
A) Make a background and make a layer copy of it

B) Hide the original layer and position 4 copies so each one is half off the canvas and a corner is touching the center.
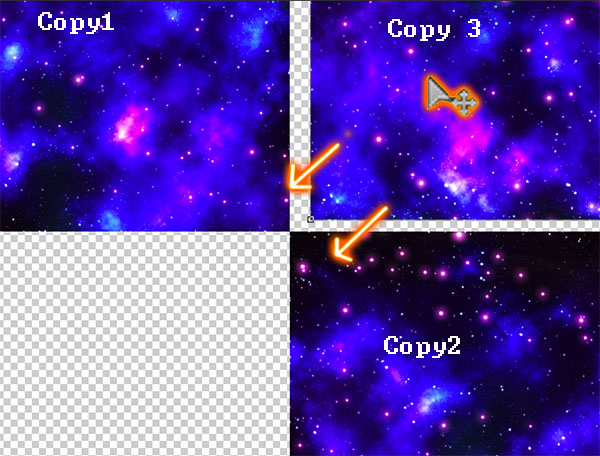
C) Use smudge and clone-copy (air-brush mode) brushes to blend the seams so they disappear. Now when you scroll this image it will not have any visible seams. Result would be something like this:

Make sure the final background is suitable for your resolution (although you can stretch a smaller one if you want with a destination-Rectangle). The map location(grid coord) and scroll offset (0-64,0-64) will be used to calculate the exact scroll value for the background. If you're using a background that's a scene(ie: hills, trees, etc), then you can't scroll infinitely in the vertical direction. For this you'd need a horizontal seamless scroller but the vertical part would simply be taller than the target's Y resolution -- and so you'd scroll the far background a percent% of it's scrollable height based on how many tiles high the game map/grid can be. Optionally, you could also have it so it only scrolls horizontally - but that might not look as good.
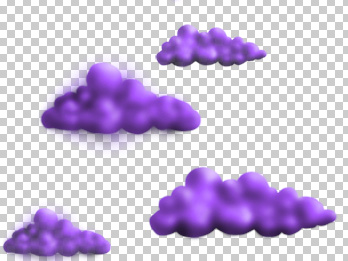
And then a middle background for clouds or anything you may want to use additive blending with (if not you'll later want to change the blend style to AlphaBlend or nonpremultiplied for the middle layer since I'm going to set it to additive for the clouds)... call your middle background "mid_background". In the example below, I just used a medium-hard brush to paint circular blobs, and used dodge and burn tools to add shadow and light:
You'll also need to create a set of tiles. You can make each one in a seperate file and copy and scale them onto your tile sheet.
Set your guide grid to 64 x 64 so you can see where the tile images align as you place them on your tiles_image sheet. ie:
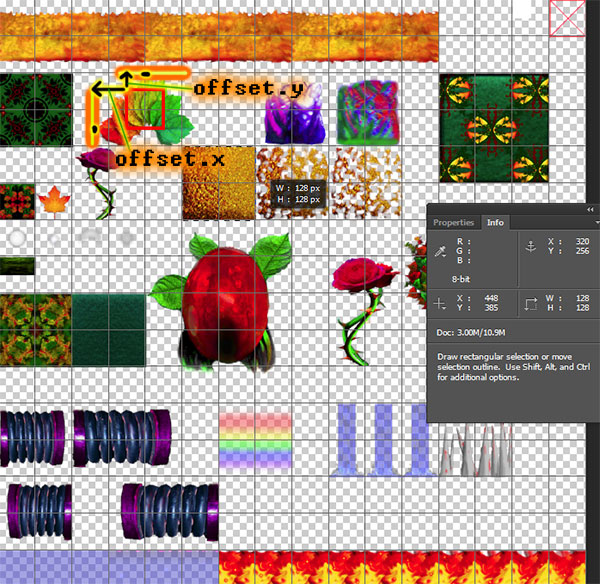
The grid lines are just guides - most graphics software gives you this option (with a hotkey to toggle on or off).
The above example shows an example of finding the tile coordinate information for setting up tiles. The red square on the leaves shows an estimate that the solid or relevant part of the tile is 1 64x64 tile (and the yellow corner dot marks where the top-left tile exists on the sheet). And for example, some could be 2 wide and 2 high (as with most square blocks on this sheet). The offset is the distance from where the tile will exist to where it should be plotted. I'll explain more later and refer back to this image. In the above I'm using the "Info window" to provide coordinates as well as width and height of rectangle selections. This tool will be very helpful for setting up your tile sheets.
NOTE: For creating the crystal effect (for above tile sheet):
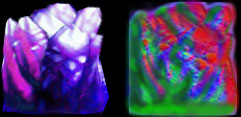
You'll need to learn how to create a normal map. There are programs that can help you do this (as well as plugins) from the 2D original (altho a more realistic one can be made from a 3D model but that would take too long to explain here). It is possible to do it manually - to edit the coloring on a copy of the crystal such that red will indicate lighting on top-right, green for bottom-left and blues sort of in the middle. To do this, I'd make 3 layer copies (1 green shaded, 1 red shaded, 1 blue shaded [Adjustments tools]) and alpha-erase parts of each layer to get the right blends of colors. These colorings tell the effect what angle light is hitting the crystals at so it can calculate how to render effects over the bumpy surface.
So let's load the images:
// L O A D
//--------
protected override void LoadContent()
{
// LOAD GRAPHICS:
far_background = Content.Load<Texture2D>("background_stars");
mid_background = Content.Load<Texture2D>("mid_background");
tiles_image = Content.Load<Texture2D>("tiles1");
If you're used to C/C++, you may notice almost nothing is put into UnloadContent (altho eventually it may be used to dispose certain things)... The reason for this is c# & monogame use a garbage collector to manage memory and will dispose of objects no longer used, on their own. There are exceptions though(or times you may want to force disposal) but that's another topic - it is worth looking into.
Above we set our standard resolution render target and everything drawn to it will be stretched onto the backbuffer later. Now we just need to draw the background layers. The far one does not need transparency so it's set as Opaque. The closer one is additive blended (black is transparent and colors are added together with background). Normally I'd suggest using alpha blending instead but I wanted to have the cloud colors change a bit based on background intensity (like the sunset).
- // DRAW OPAQUE FAR BACKGROUND
- spriteBatch.Begin(SpriteSortMode.Deferred, BlendState.Opaque, SamplerState.LinearWrap); // wrapped background 1
- spriteBatch.Draw(far_background, screenRect,
- new Rectangle((int)(-background_pos.X*0.5f), 0, far_background.Width, far_background.Height), Color.White); // scroll at half speed: *0.5
- spriteBatch.End();
- // DRAW MID BACKGROUND(S)
- spriteBatch.Begin(SpriteSortMode.Deferred, BlendState.Additive, SamplerState.LinearWrap); // wrapped background 2
- spriteBatch.Draw(mid_background, screenRect,
new Rectangle((int)(-background_pos.X), (int)-background_pos.Y, mid_background.Width, mid_background.Height), Color.White); - spriteBatch.End();
The State: LinearWrap
What this does is when the texture memory is sampled beyond the edge of the texture, it wraps around to the other side. This is kind of like how you use mod or %. Example: if the width was 100 and you sampled at x=305 then it would sample from 5.
In doing this, we can change the source rectangle we're sampling from on the Texture2D and it will wrap.
For far background, I multiply by 0.5 to reduce the horizontal scrolling by half. I don't scroll the Y direction because the level is mostly horizontal anyway and it's a distant background, but for the mid background I allow Y scrolling.
You may notice the destination rectangle is always the screenRect -- that's because since we're scrolling the sample-source, we don't need to scroll the destination for these.
- // DRAW TEMP BACKBUFFER (MainTarget) to TRUE BACKBUFFER IN MAXIMIZED WINDOWED MODE (this resolves some rare compatibility problems):
- GraphicsDevice.SetRenderTarget(null);
- spriteBatch.Begin(SpriteSortMode.Deferred, BlendState.Opaque, SamplerState.LinearWrap, DepthStencilState.None, RasterizerState.CullNone);
- spriteBatch.Draw(MainTarget, desktopRect, Color.White);
- spriteBatch.End();
- base.Draw(gameTime);
- }
The above code sets our rendering to the backbuffer and we simply copy MainTarget onto the backbuffer (destination rectangle: desktopRect). This stretches our preferred standard game resolution onto the device's window-mode resolution as though we're in full screen mode.
6) Temporary Testing:
In Update():
- if (inp.Keydown(Keys.Left)) background_pos.X++;
- if (inp.Keydown(Keys.Right)) background_pos.X--;
- if (inp.Keydown(Keys.Up)) background_pos.Y++;
- if (inp.Keydown(Keys.Down)) background_pos.Y--;
These are just for testing scrolling. Later, the player movement will determine these.
- - - - - -
7) Game map editor prerequisites...
a)
So first in Game1.cs, we'll add the names of the level we want to edit and test. These are in game1 just so it's quick and easy to change level for editing without having to remember which class these are in.
- // CHANGE THIS FOR MAKING A NEW LEVEL (use backup to retrieve a copy of old one if you accidentally save over it)
- static public string LEVEL_NAME = @"Content\\lev1.txt"; // this is stored in the BIN/execute version of Content
- static public string BACKUP_NAME = @"Content\\backup.txt";
Later level loading might be by switch(name) or just a standard name like "lev" with a number on it(ie: "lev1"). For now, levels will be txt files with a type of switch loading that makes it simple to modify file format while still being able to load old levels. Later when the game's near completion, you may want to change it into a binary format once you're certain that there's no new types of data to add.
We'll set a backup file too so if you accidentally save something you didn't want to or you liked your old level better, you can load as "backup" and it will load from the backup file (still saves to "lev1" tho)
We'll also need to know which GameState we're in (ie: editing, playing, etc.) so we'll define some states in Game1.cs:
- // GAME STATES:
- enum GameState { edit, play, game_over, menu, load_level }
- GameState gameState = GameState.edit;
b) Now go into Solution Explorer and right click over your c# project-name, and Add >> Folder and call it "Map Related Stuff".
We'll need to define sheet parts or tile images... I'll just call these objects "Sheet" (short for Sheet_Part).
Under Map Related Stuff:
Right-click and Add a class and call it "Sheet"
We'll also need a class called "Tile", so Add that too.
Above the tile class, you will want to define some tile types like this:
- // add more types to here which tell us how to draw and collide with the tile
- public enum TileType { empty, solid, reflector, spring, platform, spikes }
- //--------
- // T I L E
- //--------
- class Tile
- {
c)
Sheet(part) will keep track of:
which tile type it is: TileType, (solids can be collided with, reflectors are for crystal effects, springs are for bouncers, etc...)
where on the actual sheet it is: Rectangle,
how many tiles_wide and tiles_high will be considered occupied when this sheet part is added to a map location
the offset from it's map position to draw it at: Vector2 offset;
Add these to Sheet.cs:
- // S H E E T
- class Sheet
- {
- public TileType type;
- public Rectangle rect;
- public int tiles_wide, tiles_high;
- public Vector2 offset;
And we'll add this constructor:
- /// <summary>
- /// Setup a tile item from the tiles image sprite sheet.
- /// </summary>
- /// <param name="Type">(empty, solid, water, etc...)</param>
- /// <param name="Tiles_wide">number of this item will occupy in width (ie: 3 tiles wide will be solid) </param>
- /// <param name="Tiles_high">numver of tiles high that will be empty, solid, liquid, etc... </param>
- /// <param name="top_left_corner">top left corner of first tile (ie: first solid tile corner) - this is used to calculate the offset of the image around the tiles it occupies</param>
- public Sheet(int x, int y, int x2, int y2, TileType Type, int Tiles_wide, int Tiles_high, float top_left_corner_x, float top_left_corner_y)
- {
- int width = x2 - x + 1;
- int height = y2 - y + 1;
- rect = new Rectangle(x, y, width, height);
- type = Type;
- tiles_wide = Tiles_wide; tiles_high = Tiles_high;
- offset = new Vector2(rect.X, rect.Y) - new Vector2(top_left_corner_x, top_left_corner_y);
- }
- }
As the comments above sort of explain, it takes the top-left and bottom-right corners of the region on the sheet where we want to extract the tile image from... and the type of tile (solid, bouncey, etc), the number of tiles_wide and tiles_high to consider occupied (ie: 2x2 solid), and the top-left corner of the image where the solid(or occupied) tile would start... which it then uses to figure out the offset from the edge of the image (SEE TILES IMAGE ABOVE)... so later when looping through map tiles it can use the offset from the tile position to place the image correctly into the scene.
d) Although it's not recommended practice, let's add a SheetManager class right below the Sheet class in the same file (sheet.cs)...
(Since they're closely related and both will be very small, I prefer to keep them both in sheet.cs)
This class will just provide a place to set up sheet part entries, where it isn't cluttering up the other code:
- // S H E E T M A N A G E R (sheet definitions)
- class SheetManager
- {
- int num_sheet_parts;
- public SheetManager() { num_sheet_parts = 0; }
- // S E T U P S H E E T L E V E L 1
- public void Setup_Sheet_Level_1(ref Sheet[] sheet)
- {
- num_sheet_parts = 0;
- int n = 0;
- sheet[n] = new Sheet(0, 0, 1, 1, TileType.empty, 1, 1, 0f, 0f); n++; // nothing 0
- sheet[n] = new Sheet(0, 16, 255, 111, TileType.solid, 4, 1, 0f, 32f); n++; // grass1 1 q
- sheet[n] = new Sheet(0, 128, 127, 255, TileType.solid, 2, 2, 0f, 128f); n++; // solid block (green) 2 w
- sheet[n] = new Sheet(166, 128, 344, 255, TileType.spring, 1, 1, 224f, 160f); n++; // spring (leaves) 3 e
- sheet[n] = new Sheet(448, 128, 575, 254, TileType.reflector, 1, 1, 480f, 160f); n++; // reflective crystals 4 r
- sheet[n] = new Sheet(768, 128, 959, 319, TileType.solid, 3, 3, 768f, 128f); n++; // big solid block 5 t
- sheet[n] = new Sheet(0, 320, 63, 383, TileType.solid, 1, 1, 0f, 320f); n++; // small solid block 6 y
- sheet[n] = new Sheet(65, 321, 127, 383, TileType.empty, 1, 1, 64f, 320f); n++; // leaf decoration 7 u
- sheet[n] = new Sheet(131, 256, 213, 383, TileType.empty, 1, 1, 146f, 320f); n++; // rose 8 i
- sheet[n] = new Sheet(320, 256, 447, 383, TileType.solid, 2, 2, 320f, 256f); n++; // gold block 9 o
- sheet[n] = new Sheet(0, 512, 127, 639, TileType.solid, 2, 2, 0f, 512f); n++; // green-yellow block 10 p
- sheet[n] = new Sheet(128, 512, 256, 639, TileType.solid, 2, 2, 128f, 512f); n++; // green-solid block 11 a
- sheet[n] = new Sheet(257, 402, 511, 650, TileType.empty, 1, 1, 367f, 576f); n++; // house 12 s
- sheet[n] = new Sheet(576, 448, 702, 639, TileType.empty, 1, 1, 593f, 569f); n++; // big rose 13 d
- sheet[n] = new Sheet(704, 384, 911, 646, TileType.empty, 1, 1, 772f, 576f); n++; // tree 14 f
- sheet[n] = new Sheet(0, 448, 63, 479, TileType.platform, 1, 1, 0, 448); n++; // platform 15 g
- sheet[n] = new Sheet(768, 704, 895, 831, TileType.spikes, 2, 2, 768, 704); n++; // spikes 16 h
- // add more items here... (add more types later)
- num_sheet_parts = n;
- }
- }
- }
Obviously your own sheet part entry coordinates will be different. Eventually you may want to setup a switch based Setup_Sheet_Level(ref Sheet[] sheet, int level)
C# Lesson (skip if already understand):
You may notice that it takes a reference to a Sheet[] array which will be created in Game1 and shared by reference to other classes. By default, normally, class objects don't require ref before them as they're assumed to be referencing the original (in other words it passes the memory location of the object rather than copying to entire new object (because copying would be slow and we just need the one object)).
Even though there are no structs used here, I should still mention that structs in c# are copied if directly sent, as they're considered a value_type kinda like int, float,
etc... so better to use classes instead of structs if it is something you'll be passing a lot. Structs in c# are more for tiny data clusters that won't change often or transition. If you do plan to use structs in c# (sometimes useful), just keep in mind that if you assign struct_b = struct_a and then change parts of struct_b... don't expect that those same changes will be made in the original, because it won't be a reference... it'll be a unique copy in a different memory location.
So to recap,
- the first 4 coords = rectangle region of image on tile sheet
- next is the tile-type
- then how many tiles_wide and tiles_high should be considered occupied after placing this part (placed by top-left corner tile)
- lastly, the topleft corner (x,y) that would mark on the sheet where the first top-left corner tile would be.
ie: If the image was truly a size of 4x3 tiles... but we only want the middle part to be solid... we might say it's 2x1 and
mark the top-left corner of that 2x1 region on the tiles sheet. (see above tiles image)... the constructor then figures out how to offset the image around the tile it will be positioned with.
You may notice in the coments that I provide a brief description of what image each sheet part refers to as well as the key that will be used to place that part. In a more advanced editor, you could also have the option of picking the part from a pop-up image of the tile-sheet, using the mouse. If the sheet image is huge, you may want to use keys 1-4 to bring up 4 different sections of the tiles image to pick parts from... or scale it but it might be hard to see some parts. You could even create an editor for adjusting the image rectangles graphically (ie: a file-based "data driven design" approach) but it is a lot of extra complexity and likely won't save much time (tricky to make precise) - so maybe not the best approach in this case.
e) Go back to tile.cs
We'll need these fields for the tile class:
- //--------
- // T I L E
- //--------
- class Tile
- {
- public int index; // image index (for sheet rect)
- public TileType type; // empty, solid, spring, etc...
- public Vector2 scale;
- public Vector2 offset; // adjusts position
- public float rot; // rotation
- public bool overlap; // should it overlap the characters
- public bool stand_on; // can you stand on it?
- public bool is_solid; // does it act like a solid object?
- public bool spikes; // is it spikes (or lava)
- public bool event_active; // bounce event or some other event is already active
- public MonsterType monster_start; // type of monster to initialize at this tile ( None is default )
index = which sheet part (ie: bricks, grass, etc)
type = the actual type (how to interact with it ... ie: solid, water, bouncer, spikes, etc... )
offset = x,y distance from its map location (default is based on sheet part's offset but can be adjusted in map editing)
overlap = tells it to memorize the processed tile but show it after other images so it overlaps in the scene
stand_on = this tile can be stood upon... collision editing might allow customization of this for a map tile
is_solid = will collide with it (also could be customized in collision editing if you wanted [ie: for secret rooms])
spikes = something that you partly stand in (or bounce off of) and hurts you
event_active = currently used to determine if a bouncer(spring-like platform) has already started animation __ could be used for other types too which might have animation effects when interacted with
monster_start = None by default (thus not saved to the txt file) but if used... it will determine that a monster of some type will be initialized at this location when the game starts (and thus saved to file)
But... we don't have a MonsterType yet so:
f) Right-click on c# project_name and click Add>>Folder and call it "Monsters" ... then right-click that and Add>>Class and call it "Monster" and above the empty class, we'll add an enum for MonsterType:
- enum MonsterType { None, Mouster, Hellcat }
- class Monster
- {
Now, in Tile.cs the MonsterType should no longer be underlined as it has become valid.
g) In Tile.cs:
We'll need a constructor for initializing tiles and a Clear method to reset a tile. (Note: index == 0 will mean the tile is empty and thus it is not written to file)
- public Tile(int Index, TileType Type)
- {
- index = Index;
- type = Type;
- scale = Vector2.One;
- monster_start = MonsterType.None;
- }
- public void Clear()
- {
- index = 0; type = TileType.empty;
- scale = Vector2.One;
- offset = Vector2.Zero; rot = 0;
- overlap = false; stand_on = false;
- spikes = false; is_solid = false;
- event_active = false; monster_start = MonsterType.None;
- }
- }
REMEMBER: Anytime you add a field to Tile, you'll need to make sure they are initialized correctly and that Clear is updated to reset it correctly. If you forget to reset the new variable in Clear, then when you delete a tile, it will still think that property for that tile location should have that attribute (or behavior)... which could be bad...
h) While it is probably not "proper" practice... I would suggest adding a class called ProcessedTile just below the tile class (in the same module)... this just keeps track of tiles that are to be overlapped into the scene. ie: When tiles are processed in the map drawing methods, it uses the field, overlap, to determine if it should draw it later and if so... it copies the calculated coordinates into a "ProcessedTile" which is to be drawn later. This is a small simple class that probably doesn't need to clutter up the Solution Explorer so I just add it in the Tile.cs file at the bottom after the Tile class:
- // P R O C E S S E D T I L E
- // stores final draw information for a tile that must be rendered later or with a different shader:
- class ProcessedTile
- {
- public Vector2 pos;
- public Vector2 scale;
- public float rot;
- public Rectangle rect;
- public void Add(Vector2 position, Rectangle srcRect, float rotation, Vector2 Size)
- {
- pos = position;
- rect = srcRect;
- rot = rotation;
- scale = Size;
- }
- }
All it will need to draw the tile later... is the position, size, rotation, and source-rectangle... Later you might want to add color(tint), origin, or other instruction booleans if needed (but for simplicity, I'd leave only what's needed until you absolutely need to add other things)
i) While we're here... let's add a tiny class above the Tile class that keeps track of player start data. Since it's so small and we need almost nothing to start with, we'll just leave it in here. We really only need to know where the player starts on the map for now:
- // Starting state of map:
- class StartData {
- public int x, y; //player start position on tile map (will add more later)
- public StartData(int X, int Y) { x = X; y = Y; }
- }
- // add more types to here which tell us how to draw and collide with the tile
- public enum TileType { empty, solid, reflector, spring, platform, spikes }
- //--------
- // T I L E
- //--------
- class Tile
- {
- class Map
- {
- public const int TILES_WIDE = 100, TILES_HIGH = 50; // map dimensions
- public const int TILE_SPAN_X = 14, TILE_SPAN_Y = 10; // number of tiles processed on the screen (14 * 2= 28 horizontal, 10 * 2 = 20 verticle)
The TILE_SPAN_X,Y constants determine how many tiles to process on screen at once relative to the center tile. ie: center-14 to center+14 in the horizontal direction and -10 to +10 in the vertical direction
k) We'll need some essential field members for the map:
Tile[,] tiles == ... the map's tiles[x,y]
startData == player starting data
Later we'll add a bounce manager to keep track of bouncey spring platforms (we'll just add a comment for now)
loc == a location point on the map which is where the camera is located (in terms of tiles[x,y])
sheet[] == referring to the sheet part data[ie: source rectangles] (we still need a call to create this in Game1.cs - we'll do it later)
overlapTiles[] == stored overlapping tile data to draw overlaps after drawing everything else
We'll also need a seperate set of Processed Tiles for crystals too, to distinguish them as ones with a particular effect on them.
scroll_offset == (0-64, 0-64) - scrolling from 0 to 64 in X and Y directions... It smoothly scrolls between these numbers and when it exceeds 64, it updates the tile coordinate and resets the scroll value to 0 ... so if each tile in memory is 64x64 then it will scroll between these values and then switch tiles. (ie: if (scroll_offset.X>64f) {scroll_offset.X=0; loc.X--;}
or (ie: if (scroll_offset.X<0f) {scroll_offset.X=64f; loc.X++;} ...and same for Y...
We'll also need some variables to keep track of start and end tiles visible on screen (other methods may need to check on these)
ie: a1, b1, a2, b2
Also we'll need access to tiles_image from Game1 as well as spriteBatch... and we'll want to know where our center tile is on screen ideally...
So we'll add this to Map.cs:
- // MAP DATA
- public Tile[,] tiles; // map tiles
- public StartData startData; // info about starting state of map (like player start position)
- //public BounceMgr bounceMgr; // manages bounce events (triggered by players or monsters)
- public Point loc; // tiles map location (used to track what section of tiles to draw)
- Sheet[] sheet; // refer to the sheet data in Game1
- ProcessedTile[] overlapTiles; // tracks tiles to overlap into scene
- ProcessedTile[] crystals; // tracks crystals to be rendered differently
- Color crystal_color;
- int overlap_count, crystal_count; // number of layer2 tiles in the scene, num of crystals needing crystal shader
- public Vector2 scroll_offset; // smooth scroll between tile section updates using this (0-64, 0-64)
- public int a1, b1, a2, b2; // start and end of visible tiles
- public float sx, sy; // start coords (top-left) of tiles to draw on screen
- Texture2D tiles_image; // refers to tiles image from Game1
- Vector2 screen_center; // center of screen for a tile
- float timer; // using this to get a fluctuating wave from sin or cos
- SpriteBatch spriteBatch; // refer to spriteBatch in Game1
We haven't made a bounce manager yet so that'll remain commented for now.
l) In the Constructor, we'll need to pass in references to the sheet parts and spriteBatch:
- // C O N S T R U C T
- public Map(Sheet[] sht, SpriteBatch sprBatch)
- {
- sheet = sht;
- spriteBatch = sprBatch;
- tiles = new Tile[TILES_WIDE, TILES_HIGH]; // allocate memory
So we create a grid of tiles that's 100x50 in size... We'll allocate memory for ALL the tiles as empies because it could help prevent possible null related crash errors caused by possible bugs (ie: trying to access memory that's not allocated).
- // fill it in with default values (prefer to avoid null values - totally empty tiles not recorded to file anyway)
- for (int b = 0; b < TILES_HIGH; b++)
- {
- for (int a = 0; a < TILES_WIDE; a++)
- {
- tiles[a, b] = new Tile(0, TileType.empty);
- }
- }
- overlapTiles = new ProcessedTile[250]; // up to 250 overlap tiles on screen at once
- crystals = new ProcessedTile[250]; // up to 250 crystals in a scene at once
- for (int a = 0; a < 250; a++) overlapTiles[a] = new ProcessedTile();
- for (int a = 0; a < 250; a++) crystals[a] = new ProcessedTile();
We'll set the starting location for the editor(camera's center tile) and by default put the player there too. We'll also need to get the screen center too (-32,-32) as the target center minus half a tile size.
- // EDITOR START LOCATION:
- loc.X = 5; loc.Y = 5;
- startData = new StartData(loc.X, loc.Y); // init player start position
- screen_center = Game1.screen_center;
- //bounceMgr = new BounceMgr(tiles); // init bounce manager (for spring tiles)
- }
Later, after we make a "bounce manager" for the spring platforms, we can initialize it here too.
I decided to make a seperate method for setting the tiles_image (since it may be loaded after making the map object):
- //----------------------------
- // S E T T I L E S I M A G E (texture sprite-sheet for tiles)
- //----------------------------
- public void SetTilesImage(Texture2D tilesPic)
- {
- tiles_image = tilesPic; // keep original image in Game1 so can use it in multiple circumstances/places
- }
m) We'll need to be able to Add and Delete a tile. Keep in mind that a tile may actually refer to a cluster of tiles based on the sheet part's dimensions (tiles_wide, tiles_high).
Deleting a tile (or tile-cluster) is easy enough:
- //---------------------
- // D E L E T E T I L E
- //---------------------
- public void DeleteTile()
- {
- int i = tiles[loc.X, loc.Y].index;
- for (int b = loc.Y; b < loc.Y + sheet[i].tiles_high; b++) {
- if (b >= (TILES_HIGH - 1)) break;
- for (int a = loc.X; a < loc.X + sheet[i].tiles_wide; a++) {
- if (a >= (TILES_WIDE - 1)) break;
- tiles[a, b].Clear();
- }
- }
- }
- // CLEAR MAP
- public void ClearMap() { for (int b = 0; b < TILES_HIGH; b++) { for (int a = 0; a < TILES_WIDE; a++) { tiles[a, b].Clear(); } } }
ii) based on dimensions of the tile cluster, it clears out any tile on the map within the cluster
And ClearMap() just clears every possible tile on the map to empty.
n) To add a tile or tile cluster, it's a similar principle, except we must make sure to delete any old tile clusters that may be at that location, set the desired index, and based on the index, we copy in the default image-offset(from tile corner)... In the loop, we can also check properties of the desired tile and determine whether it should be something that we can stand_on or if it's spikes or whatever as a default (based on sheet)... later if we wanted we could make a collision editor that could modify those properties (like for secret areas and such)
- //---------------
- // A D D T I L E
- //---------------
- public void AddTile(int i)
- {
- DeleteTile(); // Delete any old tile occupations that might overlap
- tiles[loc.X, loc.Y].index = i;
- tiles[loc.X, loc.Y].offset = sheet[i].offset;
- for(int b=loc.Y; b<loc.Y+sheet[i].tiles_high; b++) {
- if (b >= (TILES_HIGH - 1)) break;
- for (int a = loc.X; a < loc.X + sheet[i].tiles_wide; a++)
- {
- if (a >= (TILES_WIDE - 1)) break;
- TileType type = sheet[i].type;
- tiles[a, b].type = type;
- if ((type == TileType.solid) || (type == TileType.spring)
- || (type == TileType.platform) || (type == TileType.spikes))
- {
- tiles[a,b].overlap = true; tiles[a,b].stand_on = true;
- if (type == TileType.spikes) { tiles[a, b].spikes = true; tiles[a, b].is_solid = true; }
- else if (type == TileType.solid) tiles[a, b].is_solid = true;
- }
- }
- }
- }
It's nice too to have the option to modify a specific map-tile's type (solid, platform, empty, etc):
- //-----------------
- // S E T T Y P E
- //-----------------
- public void SetType(TileType type = TileType.solid)
- {
- int a = loc.X, b = loc.Y;
- tiles[a,b].type = type;
- if ((tiles[a, b].type == TileType.solid) || (tiles[a, b].type == TileType.spring) || (tiles[a, b].type == TileType.platform) || (tiles[a, b].type == TileType.spikes)){
- tiles[a, b].overlap = true; tiles[a, b].stand_on = true;
- if (type == TileType.spikes) { tiles[a, b].spikes = true; tiles[a, b].is_solid = true; }
- else if (type == TileType.solid) tiles[a, b].is_solid = true;
- }
- }
And to set a monster at the tile location... we could just set the public field for monster_start, but we'll make a method for this since we may later want to add some other parameter setups (plus less code clutter later):
- // S E T M O N S T E R
- public void SetMonster(MonsterType monster)
- {
- tiles[loc.X, loc.Y].monster_start = monster;
- }
o) When we first start making a level, it would be good to have a border around the level so that the characters can never go out of bounds when testing. You could also setup a test for this to be safe.
Let's add a method to automatically create a border:
- //-------------------
- // A D D B O R D E R
- //-------------------
- public void AddBorder(int i)
- {
- for (int a = 0; a < TILES_WIDE; a++) { loc.X = a; loc.Y = 0; AddTile(i); loc.Y = TILES_HIGH - 1; AddTile(i); }
- for (int a = 0; a < TILES_HIGH; a++) { loc.X = 0; loc.Y = a; AddTile(i); loc.X = TILES_WIDE - 1; AddTile(i); }
- }
// small solid block 6 y
This indicates that the sheet part being made is for a small solid block of index 6 (so we'll pass 6 into AddBorder) ... as long as you use a tile with: "TileType.solid, 1, 1" then it will work.
The 'y' just indicates that keypress of 'y' will place this tile in editor mode.
p) I suppose we'll need a map Update() method which might update various map related animations... for now I think we really only need to update color changes for crystals using a timer. The same timer could be used to update other fx too.
Using a sin (or cos), we can oscillate the RGB values over time. I'll use a 0.2 (out of 1.0) range of color change. That's 20% change plus a base amount of red, green, or blue and each color channel will also use a slightly different rotation offset in the sin also so I'll offset the green by timer+0.5 and the blue by timer+1.0 (keeping in mind that the wave spans 6.28 rads [360 degrees] between each repeat)... so adding 1.0 is only about a 16% difference in the wave result but at least it gives some color change variation.
- //----------------------
- // U P D A T E V A R S (for updates that apply to both editor and play modes)
- //----------------------
- public void UpdateVars()
- {
- // UPDATE CRYSTAL COLOR
- timer += 0.05f;
- double t = (double)timer;
- // make color channels wave between 0.8 to 1.0 (slightly different wave for each channel)
- crystal_color = new Color( (float)Math.Sin(t)*0.2f+0.8f, (float)Math.Sin(t+0.5)*0.2f+0.8f, (float)Math.Sin(t+1.0)*0.2f+0.8f, 255);
- }
The result of each sin will be some number within the span of +1 to -1 so the *0.2 will result in +0.2 to -0.2 + 0.8 (20% up or down from 80%) - meaning it will range 0.6 to 1.0 (153 to 255 in byte values) as the timer changes. The alpha stays at 255 since the transparency itself doesn't change (will use texture(bitmap) texels(pixels) to determine alpha(s))
q) We'll need a method to draw the map's tiles onto the scene... if we're in edit mode we should signal it to show boxes or indicators that are helpful in that mode (ie: collision regions, monster starting positions, etc...).
We'll also need to establish which section of tiles would be visible based on camera/map location (loc).
- //-------------------
- // D R A W T I L E S
- //-------------------
- public void DrawTiles(bool draw_colliders = false, bool edit_mode = false)
- {
- // get the region of tiles to draw(top to bottom, left to right) on screen based on map position:
- b1 = loc.Y - TILE_SPAN_Y;
- b2 = loc.Y + TILE_SPAN_Y;
- a1 = loc.X - TILE_SPAN_X;
- a2 = loc.X + TILE_SPAN_X;
a1 = left most tile, a2 = right most
b1 = top most tile, b2 = bottom most
loc is the map location the camera should be seeing. We'll need to add a world_to_camera method later so we can set loc based on the world coordinate of the camera (this would also adjust the scroll_offset accordingly too). For now, we'll focus on drawing tiles - but first let's make sure the tile group to draw isn't out of bounds of the map of tiles[x,y]:
- // prevent out-of-bounds:
- if (b1 < 0) { b1 = 0; if (b2 < 0) b2 = 0; }
- if (b2 >= TILES_HIGH) { b2 = TILES_HIGH - 1; if (b1 >= TILES_HIGH) b1 = TILES_HIGH - 1; }
- if (a1 < 0) { a1 = 0; if (a2 < 0) a2 = 0; }
- if (a2 >= TILES_WIDE) { a2 = TILES_WIDE - 1; if (a1 >= TILES_WIDE) a1 = TILES_WIDE - 1; }
a1 and b1 might no longer be what they were if they had been out of bounds. Let's find out the number of tiles there are between the center tile and the edges:
- // calculate start coordinates for drawing tiles:
- int bdif = loc.Y - b1; // how many tiles up from middle of screen
- int adif = loc.X - a1; // how many tiles left from middle of screen
We can use this to find the screen coordinate where the first tile starts drawing (it will probably be off-screen to the top-left, but if the image is large enough, part of it will show on screen). Since each tile is 64x64 pixels, we multiply the number of tiles (adif or bdif) by 64.0f to get the pixel distance from the center:
- sx = screen_center.X - adif * 64.0f; // calculate starting x coordinate of tiles shown on screen
- sy = screen_center.Y - bdif * 64.0f; // calculate starting y coordinate of tiles shown on screen
You may remember from before that screen_center represents where a centered tile would be on the screen (mainTarget) [which is why we previously translated the coord by (-32,-32) [half a tile size])
Now sx,sy represent the first position tiles will start drawing at when looping between b1 to b2 on the outer loop and a1 to a2 on the inner loop.
We'll need a few more variables to track our progress through the loops:
- // draw the section of tiles that should be seen:
- float x, y; // screen coord of tile
- int a, b, i; // current tile indices and sheet index
- Sheet sh; // reference to a sheet
- overlap_count = 0; // will count overlap tiles
- crystal_count = 0;
- Vector2 tile_pos; // final tile position on screen (with offsets)
- a,b used with tiles[a,b] in the loop
- x,y tracking screen position of tile in loop
- i = sheet index
- sh = points to the sheet part (at index i)
- overlap_count, crystal_count ... just counts how many ProcessedTiles have been stored to be drawn later
- tile_pos ... the final draw position after offsets are added
We'll loop through outer loop b1 to b2 using b (while keeping track of the y position of the tiles to draw starting it at y=sy) and the inner loop from a1 to a2 using a... and at the start of each inner loop we set the x coord to sx
In each loop, we'll reposition the tiles based on scroll_offset (0-64,0-64) for smooth scrolling... so tile_pos will be the x,y of the tile + scroll_offset ... we'll update scroll_offset later based on camera position.
If the index read from the map's tile is 0... then it's empty and it can skip the loop this time (but only after indicators are drawn which we'll add later)
We'll also need to offset the image for the tile_pos by the tile[a,b].offset so that it's correctly situated about it's corresponding tile location. tile[a,b].offset is normally extracted from the sheet part's calculated image offset but can be further offset later using the editor... this way you can move objects away from their home tile and position, rotate, and scale them however you want.
Then we either store the tile_pos (and any other draw data) as a ProcessedTile (to be shown later)... or we draw it now if it's a background tile-part or just something that will be under the player or other characters.
- b = b1; y = sy;
- while (b < b2)
- {
- a = a1; x = sx;
- while (a < a2)
- {
- i = tiles[a, b].index;
- tile_pos = new Vector2(x, y) - scroll_offset; // x,y location - scrolling amount (0-64) [ ie: scroll 0-64 then new tile loc ]
- // A C T U A L T I L E I M A G E S A R E D R A W N -------------------------------------------------------
- if (i == 0) { a++; x += 64.0f; continue; } // empty so skip to next one
- sh = sheet[i];
- tile_pos += tiles[a, b].offset; // make sure to add the tile's offset (editor-customized placement of image)
- // STORE OVERLAPS AND CRYSTALS ... ELSE DRAW IT
- if (tiles[a, b].overlap) {
overlapTiles[overlap_count].Add(tile_pos, sh.rect, tiles[a, b].rot, tiles[a, b].scale); overlap_count++;
} - else if (tiles[a, b].type == TileType.reflector) {
crystals[crystal_count].Add(tile_pos, sh.rect, tiles[a, b].rot, tiles[a, b].scale); crystal_count++;
} - else spriteBatch.Draw(tiles_image, tile_pos, sh.rect, Color.White, tiles[a, b].rot, Vector2.Zero, tiles[a, b].scale, SpriteEffects.None, 0f);
- //-------------------------------------------------------------------------------------------------------------
- a++; x += 64.0f;
- }
- b++; y += 64.0f;
- }
As you can see, the x and y coordinates move 64 pixels per loop with each (a,b) tile update.
Technically we could have said sheet[i].rect instead of pointing to sheet[i] and using sh.rect... we didn't really gain anything other than to shorten a few lines... but keep this idea in mind later because sometimes it does make a big difference in code clutter (as long as it's still easy to understand the code).
Also technically if you wanted, with a few changes, you could use Lists for overlapTiles and crystals (the ProcessedTiles)... performance difference would not be noticable.
spriteBatch draws from the tiles_image loaded in Game1.cs at the new tile position extracting from source-rectangle: sheet[i].rect, using tile's rotation, at origin (0,0), using tile's size (default 1,1), non-flipped, depth 0
Later you may have tiles like slopes that need to be flipped in which case you'll need to store that data also.
Let's add some indicators to this loop which indicate solid tiles, platforms, and monster starting locations... I'll extract from my tiles_image, a square with an X through it as an indicator. If your tiles_image has a different indicator size and position, you'll need to change the source rectangles. Here's the new code with indicators added before the the draw call and you'll notice it skips the tile drawing... well... the reason for this is in the editor mode, it will draw ALL the tiles first, and then if it is set to show colliders, it will call the draw method again with show_colliders set to true (and edit mode too obviously). With just edit mode it will draw monster starting locations over top of the scene and with show_colliders it will draw boxes showing collision regions over the scene (and it updates the loop and uses continue to skip redrawing the tiles). If you examine the code you'll probably understand what I mean better:
- b = b1; y = sy;
- while (b < b2)
- {
- a = a1; x = sx;
- while (a < a2)
- {
- i = tiles[a, b].index;
- tile_pos = new Vector2(x, y) - scroll_offset; // x,y location - scrolling amount (0-64) [ ie: scroll 0-64 then new tile loc ]
- // E D I T O R L O C A T I O N H E L P E R S ( EDIT MODES ONLY ) --------------------------------------------------------
- // if draw_colliders is true then all we do is draw the colliders and continue (skips the other drawing since it was already drawn)
- if (draw_colliders)
- {
- if ((tiles[a, b].is_solid) || (tiles[a, b].stand_on))
- {
- Vector2 siz = Vector2.One;
- if (!tiles[a, b].is_solid) siz = new Vector2(1f, 0.4f); // show passable platforms differently
- spriteBatch.Draw(tiles_image, tile_pos, new Rectangle(960, 0, 63, 63), Color.Purple,
0f, Vector2.Zero, siz, SpriteEffects.None, 0f); - a++; x += 64.0f; continue;
- }
- }
- if (edit_mode)
- {
- if (tiles[a, b].monster_start != MonsterType.None)
- {
- spriteBatch.Draw(tiles_image, tile_pos, new Rectangle(960, 0, 63, 63), Color.Yellow,
0f, Vector2.Zero, 1f, SpriteEffects.None, 0f); - }
- a++; x += 64.0f; continue;
- }//-------------------------------------------------------------------------------------------------------------------------
- // A C T U A L T I L E I M A G E S A R E D R A W N --------------------------------------------------------------------
- if (i == 0) { a++; x += 64.0f; continue; } // empty so skip to next one
- sh = sheet[i];
- tile_pos += tiles[a, b].offset; // make sure to add the tile's offset (editor-customized placement of image)
- // STORE OVERLAPS AND CRYSTALS ... ELSE DRAW IT
- if (tiles[a, b].overlap) { overlapTiles[overlap_count].Add(tile_pos, sh.rect, tiles[a, b].rot, tiles[a, b].scale); overlap_count++; }
- else if (tiles[a, b].type == TileType.reflector) { crystals[crystal_count].Add(tile_pos, sh.rect, tiles[a, b].rot, tiles[a, b].scale); crystal_count++; }
- else spriteBatch.Draw(tiles_image, tile_pos, sh.rect, Color.White, tiles[a, b].rot, Vector2.Zero, tiles[a, b].scale, SpriteEffects.None, 0f);
- //-------------------------------------------------------------------------------------------------------------------------
- a++; x += 64.0f;
- }
- b++; y += 64.0f;
- }
The indicators would be colored more appropriately if the original box image was white or light-gray. Since it's red, it pretty much only shows up in shades of red. If it was purple originally, I could get shades of blue, purple, or red also... you get the idea... we need at least some color in each color channel to get desired color tints.
We need methods also for drawing the stored ProcessedTiles (like overlaps and crystals):
- //-------------------------
- // D R A W O V E R L A P S ( probably more than half the tiles are overlaps [drawn on top of character layer] )
- //-------------------------
- public void DrawOverlaps()
- {
- int i = 0;
- while (i < overlap_count)
- {
- spriteBatch.Draw(tiles_image, overlapTiles[i].pos, overlapTiles[i].rect, Color.White, overlapTiles[i].rot, Vector2.Zero, overlapTiles[i].scale, SpriteEffects.None, 0f);
- i++;
- }
- }
Same principle applies to crystals, except they're drawn immediately after the background tiles and they make use of a sprites render-target that holds all the character images. Afterwards the actual sprite target layer is drawn onto the scene, and finally the overlaps (above).
Here's the method:
- //-------------------------
- // D R A W C R Y S T A L S
- //-------------------------
- public void DrawCrystals()
- {
- int i = 0;
- while (i < crystal_count)
- {
- spriteBatch.Draw(tiles_image, crystals[i].pos, crystals[i].rect, crystal_color, crystals[i].rot, Vector2.Zero, crystals[i].scale, SpriteEffects.None, 0f);
- i++;
- }
- }
The effects (and needed sprite render-target) are set up in Game1 before calling this draw method. I'll show you how to do this later...
r) Right-Click on "Map Related Stuff"
in solution explorer and Add>>Class "Conv"
In Conv.cs, change it to:
static public class Conv
{
}
This will contain universally available functions that can be used for conversions...
We'll need:
GetTileCoord which takes a world position and returns a tile location as a Point (indices x,y)
We'll make 2 versions of it ... one which also takes a reference to an offset. The offset is updated and can be used to get the correct scroll_offset based on the world_position. We'll apply this later for getting the tile location and scroll_offset based on camera position.
We'll also want an easy way to convert world coords to screen coords (and for Rectangles)... and maybe even a simple way to get a tile's world coordinates:
- // -------------------------
- // G E T T I L E C O O R D
- // -------------------------
- /// <summary>
- /// Gets the tile map coordinate that something occupies [ie: 16 tiles right, 12 tiles down]
- /// </summary>
- /// <param name="position"> The world coordinate (in pixels) </param>
- /// <param name="offset"> The pixel offset from the corner of the occupied tile location that is returned (ie: useful for smooth scrolling) </param>
- /// <returns> The occupied tile location in tiles [ie: 6 tiles right, 4 tiles down] </returns>
- static public Point GetTileCoord(Vector2 position, ref Vector2 offset)
- {
- Point tile;
- tile.X = (int)position.X / 64;
- tile.Y = (int)position.Y / 64;
- offset.X = (int)(position.X - tile.X * 64);
- offset.Y = (int)(position.Y - tile.Y * 64);
- return tile;
- }
- static public Point GetTileCoord(Vector2 position)
- {
- Point tile;
- tile.X = (int)position.X / 64; tile.Y = (int)position.Y / 64;
- return tile;
- }
The first GetTileCoord (will be used with camera world position) is a little more complex than the second one since we also need the scroll_offset (0-64, 0-64)... So we get the tile that the position would exist at by dividing by 64(tile size) and then obtain the difference from the world-position-corner(tile * 64) of the closest tile to the actual world position. This difference would be the scroll offset.
Go back to Game1.cs and add this to the top with the other variables:
- static public Vector2 cam_pos; // world position of camera
This will be used to sort out where we're looking in in world coordinates (pixel distances) on the game map.
Go back to Conv.cs
and add these other conversions:
- //----------------------------
- // W O R L D T O S C R E E N
- //----------------------------
- static public Vector2 world_to_screen(Vector2 world_position)
- {
- return world_position - Game1.cam_pos + Game1.screen_center;
- }
- // BBOX WORLD TO SCREEN
- static public Rectangle bbox_world_to_screen(Vector4 bbox)
- {
- bbox.X = bbox.X - Game1.cam_pos.X + Game1.screen_center.X; bbox.Y = bbox.Y - Game1.cam_pos.Y + Game1.screen_center.Y;
- bbox.Z = bbox.Z - Game1.cam_pos.X + Game1.screen_center.X; bbox.W = bbox.W - Game1.cam_pos.Y + Game1.screen_center.Y;
- Rectangle s_box = new Rectangle((int)bbox.X, (int)bbox.Y, (int)(bbox.Z - bbox.X), (int)(bbox.W - bbox.Y));
- return s_box;
- }
- //------------------------
- // T I L E T O W O R L D
- //------------------------
- static public Vector2 tile_to_world(Point tile_loc)
- {
- return new Vector2(tile_loc.X * 64, tile_loc.Y * 64);
- }
world_to_screen simply takes a world coordinate and figures out where it would be relative to the camera (as positioned over the screen center).
bbox_world_to_screen is the same idea. tile_to_world is just converting a tile location on the map to actual world coordinates (in pixels).
Now return to Map.cs
And we can add the following method:
- //----------------------------
- // W O R L D T O C A M E R A -- MATCH WORLD VIEW TO CAMERA
- //----------------------------
- public void world_to_camera(Vector2 cam_pos, ref Vector2 background_pos)
- {
- scroll_offset = Vector2.Zero;
- loc = Conv.GetTileCoord(cam_pos, ref scroll_offset); // get location of center of screen as a tile coordinate in the map (and map's scroll offset [0-64, 0-64])
- nd: #0c0c0c">// W O R L D T O C A M E R A -- MATCH WORLD VIEW TO CAMERA
- //----------------------------
- public void world_to_camera(Vector2 cam_pos, ref Vector2 background_pos)
- {
- scroll_offset = Vector2.Zero;
- loc = Conv.GetTileCoord(cam_pos, ref scroll_offset); // get location of center of screen as a tile coordinate in the map (and map's scroll offset [0-64, 0-64])
- background_pos.X = (loc.X * 64 + scroll_offset.X) * -0.5f; // reminder: using wrap mode to draw background (so values will wrap)
- background_pos.Y = (loc.Y * 64 + scroll_offset.Y) * -0.5f; // so set scroll of background to half of total world scroll at this location (half since it scrolls slower)
- }
This uses the camera's world position to get a camera tile location (to scroll tiles around) and the scroll offset(0-64,0-64)... It will know which section of tiles to draw based on the loc value and how to position them based on the scroll_offset.
scroll_offset is calculated appropriately by Conv.GetTileCoord
We also need to update the background scrolling based on how much we've moved through the level (and since it's wrapping we don't care how big these numbers get). We multiply by -0.5 to cut the distance covered in half (because backgrounds are farther away) and negative because it's changing the sample source position rather than the destination position (because sample-wrapping).
s) Go back to Game1.cs
Add the following variables up top somewhere:
- //MAP DATA (put this in a class later)
- const int MAX_SHEET_PARTS = 300; // maximum allowed sprite-sheet parts for tiles image
- Sheet[] sheet; // sprite sheet data for tiles (could use a list)
- SheetManager sheet_mgr; // where a level's sheet definitions can be edited
- Map map; // holds all the tiles map stuff
- //Editor editor; // map editor
We haven't made an editor yet, so we'll leave a comment as a reminder for now.
We'll need our Sheet[] which actually holds the sheet parts (tile image data). sheet_mgr will just setup sheet data for each level.
In Initialize() we need to init these:
- // INIT MAP
- sheet = new Sheet[MAX_SHEET_PARTS];
- sheet_mgr = new SheetManager();
- map = new Map(sheet, spriteBatch);
In LoadContent():
// SET IMAGE FOR TILES
map.SetTilesImage(tiles_image); // this might be used in multiple places so send a reference to map but store tiles here
And add this in there too:
- // later we will want update to check if loading a new area is needed... and then have it call a method to load based on the level or area (game-state in update)
- sheet_mgr.Setup_Sheet_Level_1(ref sheet);
- // MAKE SAFETY BORDER FOR MAP (using tile 6 - small block):
- map.AddBorder(6);
SetTilesImage set's our tile sheet (texture2D) and sheet_mgr sets up the rectangle sources and offsets and such for the images on that sheet (to be used as tiles or tile clusters) and AddBorder puts a safety barrier around the level so players don't fall out.
Go to Game1.cs Update()
After the Keypress(Escape) for Exit, Add the call to map update (which only updates crystal colors for now):
map.UpdateVars();
Also we'll need a GameState switch... right now this could be edit mode or play mode or game over ... etc...
Later you may want to add states to load_level(n), play_cut_scene(n) or special menus... You may even have states within states like a type of MenuState in play mode (ie: none, main_menu, inventory, spell_select, etc...)
For now we'll add a few basic state switches:
- switch (gameState)
- {
- case GameState.play:
- //-----------------
- // P L A Y M O D E (input/updates)
- // CHECK FOR GAMESTATE CHANGES
- if (inp.Keypress(Keys.E)) { gameState = GameState.edit; }
- // MOVE CAMERA
- //cam_pos += (player.pos - cam_pos) * 0.1f; // smooth pan camera toward player's world position
- // MATCH WORLD VIEW TO CAMERA
- map.world_to_camera(cam_pos, ref background_pos); // (what you see in the world based on where camera is)
- break;
- case GameState.edit:
- //----------------------
- // E D I T O R M O D E (input/updates)
- cam_pos = map.loc.ToVector2() * 64;
- // SWITCH TO PLAY MODE
- if (inp.Keypress(Keys.Enter)) gameState = GameState.play;
- break; //---------------- end editor mode
- case GameState.game_over:
- // G A M E O V E R (input)
- if (inp.Keypress(Keys.Escape) || inp.Keypress(Keys.Enter)) Exit(); // change to go to menu state later
- break;
- }
I'll explain this in more detail later.
In edit mode we'll eventually add a call to editor.Update() [after we make the editor]... and in this we can get input from the user to change loc directly causing the tiles shown to change in accordance to what the center tile (loc) is. There's no smooth scrolling in editor mode so we just set the camera position to the map's world position [in pixels, so * 64]
E key goes to edit mode and Enter goes to play mode.
Game Over state allows exit only (for now), but later it would best to go to a title screen with a menu of options.
As you may remember from before, map.world_to_camera will update the loc (for camera tile location) and scroll_offset (for smooth scrolling) as well as modify background_pos so that it wrap-scrolls the background sample sources according to world_position.
Another reason you may want to scroll backgrounds based on world position(rather than updating based on scroll_offset changes), is because (for example) if you had a non-repeating middle-background that was taller than the mainTarget display, and you wanted it to scroll vertically... you'd need it to reach the bottom of the y scrolling when you reach the bottom of the level... and the top of the image when you reach the top of the level... In this case the y scrolling for the middle background would be a percentage of the middle background's scroll maximum distance based on the percentage down your player is toward the bottom of the level. However in that case you'd need a few extra variables.
8) In Game1.cs Draw()
We'll lay down the drawing frame-work and psuedocode so we know what order to draw things and how to insert our render targets and effects into the scene just right. Since many components aren't developed yet, they'll just be comment placeholders for now:
- // DRAW SPRITES TO A SPRITE TARGET (so we can use it in crystal fx):
- if (gameState == GameState.play) //PLAY MODE
- {
- // SET RENDER TARGET FOR SPRITES (and clear it as TransparentBlack)
- // DRAW MONSTERS
- // DRAW PLAYER(S)
- }
- //-------------------
- GraphicsDevice.SetRenderTarget(MainTarget); // like a substitute backbuffer at desired resolution (stretched to true backbuffer after)
- // SKIP TO DRAW_OTHER_STATES IF NEEDED:
- if ((gameState != GameState.edit) && (gameState != GameState.play)) goto DRAW_OTHER_STATES; // an old tactic to avoid superfluous programming (use goto very sparingly and very cautiously)
- //-------------------------------------only for edit and play gameStates -------------------------------:
- // DRAW OPAQUE FAR BACKGROUND
- spriteBatch.Begin(SpriteSortMode.Deferred, BlendState.Opaque, SamplerState.LinearWrap); // wrapped background 1
- spriteBatch.Draw(far_background, screenRect, new Rectangle((int)(-background_pos.X * 0.5f), 0, far_background.Width, far_background.Height), Color.White); // scroll at half speed so *0.5
- spriteBatch.End();
- // DRAW MID BACKGROUND(S)
- spriteBatch.Begin(SpriteSortMode.Deferred, BlendState.Additive, SamplerState.LinearWrap); // wrapped background 2
- spriteBatch.Draw(mid_background, screenRect, new Rectangle((int)(-background_pos.X), (int)-background_pos.Y, mid_background.Width, mid_background.Height), Color.White);
- spriteBatch.End();
- //-------------------
- spriteBatch.Begin(SpriteSortMode.Deferred, BlendState.AlphaBlend, SamplerState.LinearClamp, DepthStencilState.None, RasterizerState.CullNone);
- map.DrawTiles(); // D R A W T I L E S
- spriteBatch.End();
- //-------------------
- // APPLY A CRYSTAL EFFECT TO THESE:
- // ...SET CRYSTAL VALUES FOR CRYSTAL FX... ie: the render target for sprites that will be made(sprite_target) [see above in play mode]
- // SPRITEBATCH BEGIN WITH CRYSTAL FX
- //map.DrawCrystals(); // D R A W C R Y S T A L S
- // SPRITEBATCH END
- spriteBatch.Begin(SpriteSortMode.Deferred, BlendState.AlphaBlend, SamplerState.LinearClamp, DepthStencilState.None, RasterizerState.CullNone);
- // SHOW SPRITES
- // DRAW THE SPRITE TARGET INTO THE SCENE
- // DRAW OVERLAPS
- map.DrawOverlaps();
- // DRAW ADDITIVE EFFECTS
- // E D I T M O D E only - - - - -
- if (gameState == GameState.edit)
- {
- // EDITOR DRAW LOCATORS
- } // - - - - - - - - - - - - - - - -
- // TEXT / HUD ---
- if (gameState == GameState.play)
- {
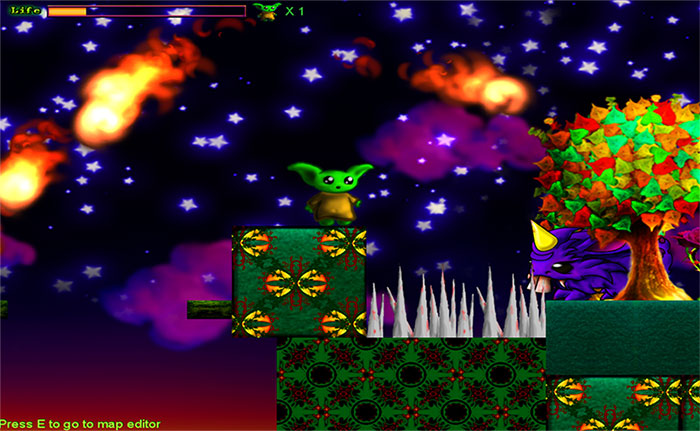
- spriteBatch.DrawString(font, "Press E to go to map editor", new Vector2(1, screenH - 50), Color.DarkGreen); spriteBatch.DrawString(font, "Press E to go to map editor", new Vector2(0, screenH - 49), Color.GreenYellow);
- // DRAW HUD HERE (heads up display... ie: lifebar)
- }
- else
- { // SHOW EDITOR INSTRUCTIONS
- }
- spriteBatch.End();
- DRAW_OTHER_STATES: // (label for goto to avoid superfluous programming [use sparingly and cautiously] )
- //----------------
- switch (gameState)
- {
- case GameState.game_over: // maybe add fade transitions later
- spriteBatch.Begin(SpriteSortMode.Deferred, BlendState.AlphaBlend, SamplerState.LinearWrap);
- GraphicsDevice.Clear(Color.Black);
- // SHOW TEXT FOR GAME OVER
- spriteBatch.End();
- break;
- }
- // DRAW TEMP BACKBUFFER (MainTarget) to TRUE BACKBUFFER IN MAXIMIZED WINDOWED MODE (this resolves some rare but possible compatibility problems):
- GraphicsDevice.SetRenderTarget(null);
- spriteBatch.Begin(SpriteSortMode.Deferred, BlendState.Opaque, SamplerState.LinearWrap, DepthStencilState.None, RasterizerState.CullNone);
- spriteBatch.Draw(MainTarget, desktopRect, Color.White);
- spriteBatch.End();
We still don't have a font, so spriteBatch.DrawString won't work just yet.
9) Fonts... Right-click on Content.mgcb to open the Monogame Pipeline and click Edit>>Add>>New Item and select spriteFont and name it Font. You can open the file and modify the font's properties. I changed it to size 14, and bold so it's easy to read.
Go to the top of Game1.cs and under //DISPLAY parameters (under SpriteBatch spriteBatch;) add the following:
SpriteFont font;
Now under LoadContent(), under //LOAD GRAPHICS section, add:
font = Content.Load<SpriteFont>("Font");
You've now loaded the font to use with DrawString in the above Draw code.
10) Game Over state... now that we have a font... for now, let's just put a simple Game Over message on the screen. Just go into Draw() and replace // SHOW TEXT FOR GAME OVER with the DrawStrings you see below:
- DRAW_OTHER_STATES: // (label for goto to avoid superfluous programming [use sparingly and cautiously] )
- //----------------
- switch (gameState)
- {
- case GameState.game_over: // maybe add fade transitions later
- spriteBatch.Begin(SpriteSortMode.Deferred, BlendState.AlphaBlend, SamplerState.LinearWrap);
- GraphicsDevice.Clear(Color.Black);
- spriteBatch.DrawString(font, "G A M E O V E R", screen_center + new Vector2(-80, -20), Color.LimeGreen);
- spriteBatch.DrawString(font, " (press enter) ", screen_center + new Vector2(-62, 20), Color.LimeGreen);
- spriteBatch.End();
- break;
- }
The above just offsets the 2 lines of text 20 pixels above the screen center and 20 below it (the x offsets depend on text size).
So, centering the strings may depend a bit on the message length and font size
You could make a text class to handle this automatically too:
ie: text.DrawCentered("G A M E O V E R", 0, -20, Color.Lime);
>>>NEXT PAGE (2)<<<